SHARPENING X-TRANS FILES IN ADOBE LIGHTROOM (REVISITED)
Original Article - Oct 2014, Revised 20 Jan 2023
This guide is a rewritten version of my original guide to sharpening X-Trans files from 2014 when I was using Lightroom 5 and the Fuji X-T1. Lightroom wasn’t the best application for processing Fuji Raw files, because artefacts were introduced when sharpening images that held a lot of fine detail. Now, nearly a decade later, the problem still hasn’t been resolved; ‘worms’ or ‘wax’ like artefacts are still evident in Lightroom processed Fuji images today. Consequently, many photographers have migrated to alternative image processing software like Capture One and Iridient which eliminate the problem completely, but for those of us who love Lightroom for all its foibles, thankfully, there are methods of sharpening which eliminate the problem to an acceptable level.
The basis of my original article, back in 2014, was the counter-intuitive discovery that cranking up the DETAIL slider all the way up to 100 when sharpening an image almost eliminated the ‘waxing’. I was blown away by how many photographers got in touch following that article, to say how helpful they'd found it, many saying that they had found it “life-changing”! Since that time there have been many updated versions of Lightroom, and several new iterations of the X-Trans sensor. Many of the resultant combinations have benefited from different optimum settings. I’ve had countless emails and communications through social media since 2014, asking me for advice about the best setting to use with the latest X-Trans cameras and different versions of Lightroom. What follows, is a description of my personal preferences; the settings that I've found work best for me, for creating exhibition prints, up to A1 size, using the latest version of Lightroom (at the time of writing, I’m using Lightroom Classic 12.1, with Camera Raw 15.1).
I’m quite obsessive about print quality, so these are the conclusions following a huge amount of time spent experimenting, looking at sections of large prints with different sharpening settings and judging them blind. I will make large sets of prints of the same image, all with different sharpening settings, then carefully number them in an intentionally random fashion, with the numbers out of sight on the back of each print, and then shuffle them up like a pack of cards before studying them for optimum image quality.
The differences are sometimes grossly obvious, but often extremely minor and nuanced, so examination of the results can be quite time consuming if done properly. I order the prints from best to worst, before turning them over and cross-referencing the numbers with the list made at the beginning of the process, to decipher which prints have the winning recipes. I have also shown these images to other photographers, and so far the ordering of best to worst is subject to pretty much universal agreement.
At the outset, I should say that everything that follows is an ‘opinion’ about a creative process. The settings used for sharpening to create the perfect image might vary between photographers because different combinations create prints with minor nuances of difference that will vary in their visual appeal depending on personal preference. So although I'm going to be very prescriptive in sharing my 'perfect' Lightroom recipes for the different X-Trans sensors, your mileage may vary.
Sharpening remains one of the most taxing aspects of the digital process and consequently many photographers prefer to stick to safe and secure ways, either using presets, plug-ins, exporting to Photoshop or ultimately using JPEGs straight from camera.
X-Trans sensors produce wonderful JPEGs, and all the usual advice about always shooting in Raw doesn’t necessarily hold true anymore. There are now many professional photographers who happily shoot JPEG using X-Series cameras all the time and have no complaints.
JPEGs are very convenient, but for a landscape photographer like me, interested in the creative process and using post-processing as part of the digital alchemy, Raw files are so much more versatile. Sharpening Raw files from the X-Trans processor can be challenging for those who have grown familiar with more traditional Bayer array sensors; they demand a different approach and even experienced photographers will find there is a learning curve.
The processing of any digital image requires two essential and distinct types of sharpening: capture sharpening and output sharpening. Output sharpening is the final step in preparing an image for printing or display on screen. Because output sharpening always depends on known variables like printer model, paper type, and degree of enlargement, it's best performed automatically. In Lightroom, output sharpening is applied in the print module or for images intended for display on-screen it is applied on export. This guide relates only to sharpening that requires our human judgement, capture sharpening.

You can save your own presets to speed up the sharpening process. I always switch off Color Noise Reduction for Fuji images made at base ISO, it gives better results.
WHAT IS CAPTURE SHARPENING ?
The unprocessed digital image is an imperfect representation of reality. When the shutter release is clicked, the shutter opens, and light is projected from the scene through the lens and onto the sensor. The image captured by the sensor is a degraded version of the image projected onto it due to separations between the micro-lenses overlying the light-wells on the sensor and, with conventional sensors, the blurring effects of the anti-alias filter. The purpose of capture sharpening is to correct for these flaws. When shooting JPEGs, the camera applies capture sharpening, but when shooting Raw images, no sharpening is applied.
In Lightroom we apply capture sharpening by using the sharpening controls within the DETAIL panel of the DEVELOP module. The panel is appropriately named because sharpening works by looking for edges within the detail or micro-detail of the image; it accentuates some or all of them with relative degrees of intensity and spread according to the parameters we select. The amount of capture sharpening required varies depending on the camera, lens and aperture used and the characteristics of the individual image.
THE KEY TO SUCCESSFUL X-TRANS CAPTURE SHARPENING
At the time of writing in January 2023, we have recently been introduced to the fifth iteration of the X-Trans sensor, which initially appeared as a 26-megapixel version in the X-H2S and more recently as the 40-megapixel X-Trans5 sensor in the X-H2 and, my latest acquisition, the incredible X-T5. I have cameras using all the different X-Trans sensors except for the 26-megapixel X-H2S, and I've experimented extensively to discover the perfect settings to use as a starting point for each model; to my personal liking anyway.
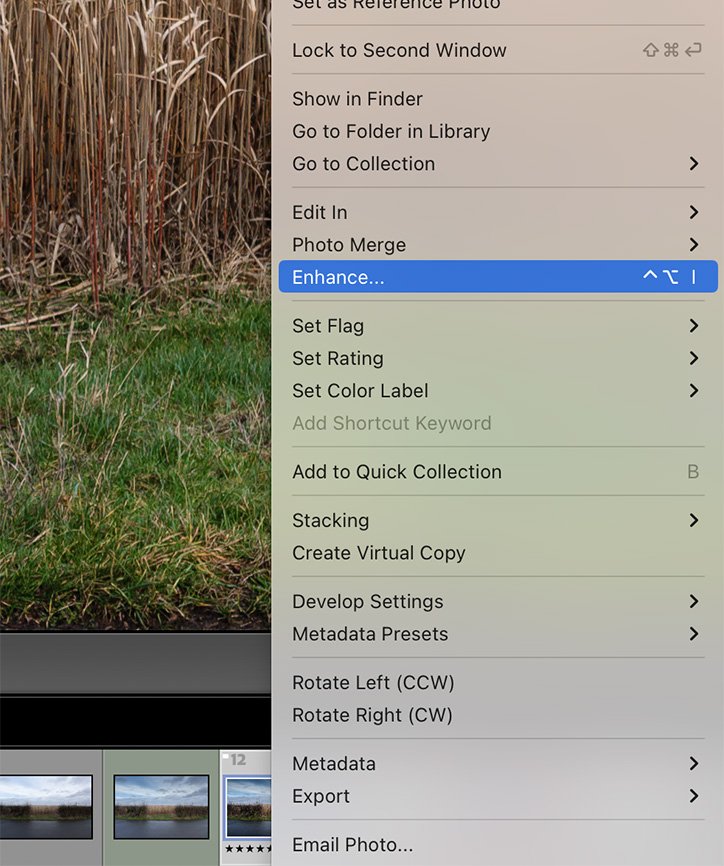
Before we consider which sharpening settings work best with each sensor, there is an important initial step in the Lightroom/Fuji workflow that should precede everything. I've found that all images benefit significantly from application of the ENHANCE feature, accessed under the PHOTO menu (on the top menu bar) or by right-clicking the image thumbnail. To get the best results from sharpening, it is essential to always use the ENHANCE feature on all images. Your first step in the editing of any Fuji RAF file should be to click ENHANCE, then choose the RAW DETAILS option and apply it.

All of the following recommended sharpening settings assume that you have first enhanced your image.
DIFFERENT APPROACHES FOR DIFFERENT SENSORS
The main message in my original article, related to the processing of images from the 16-megapixel X-Trans2 sensor found in the Fuji X-T1 camera using Lightroom5. I had discovered that the key difference between Raw files from conventional sensors and Raw files from the X-Trans2 sensor was that they favoured very different DETAIL slider settings: part of the sharpening control set within the DETAIL panel of the DEVELOP module.
Whereas conventional sensors historically favoured a relatively low DETAIL slider setting and risked introduction of artefacts with very high detail settings, for X-Trans2 files, the reverse was (and still is) true; they favour a high DETAIL slider setting and do not suffer anywhere near as much from introduction of artefacts. In fact, with X-Trans2 files, you’ll see more trouble from artefacts (albeit different ones) at lower detail settings. To anyone who has spent time processing conventional (Bayer array sensor) Raw files, this is completely counter intuitive.
The DETAIL slider affects how Lightroom processes and emphasises fine details. It does this by changing the bias of which sharpening algorithms are being used. X-Trans2 files can take a lot of capture sharpening and they like a specific mathematical method known as ‘deconvolution’ sharpening. For my landscape work with the X-Trans2 sensor I found that most images worked best with the DETAIL slider set all the way over to the right at 100; my understanding is that when the DETAIL is set to 100, Lightroom uses ‘deconvolution’ algorithms in preference.
When the X-T2 and X-Pro2 (24-megapixel X-Trans3 sensor) cameras were introduced, I had some discussions with other photographers and ended up modifying my previous approach. At the time, my baseline settings shifted to a relatively lower DETAIL setting of 60. For the versions of Lightroom available at the time (importantly, prior to the introduction of the ENHANCE feature), this setting worked well.
However, with the latest versions of Lightroom Classic, I've changed my approach. Once an X-Trans3 RAF file has been ENHANCED, I find that reverting to the 'deconvolution' method used with X-Trans2, with a DETAIL setting of 100, now works better than the 60 setting. I find a reasonable starting point for the AMOUNT setting is now around 45.
X-TRANS 4 AND 5 SENSORS ARE VERY DIFFERENT
With the introduction of the X-Trans4 sensor (found in the X-T3, X-T4, X-Pro3 and X-E4 cameras), everything changed, and the best baseline settings to be recommended for the 40-megapixel X-Trans5 sensor (found in the X-T5) are very similar.
Again, as always (with all sensors), the first step, before any other editing, is to ENHANCE > RAW DETAILS. Then once enhanced, RAF files from X-Trans4 and 5 respond best to a completely different strategy, using a HIGH AMOUNT and LOW DETAIL setting.
For my X-Trans4 files, I start with AMOUNT at 100 and DETAIL around 10, and for my 40-megapixel X-Trans5 (X-T5) files, so far, I'm finding the same settings work perfectly. While I can speak with some authority about my favoured X-Trans4 settings, I have only just acquired my X-T5, so it's still early days yet, I have a feeling the 40-megapixel files might even take a bit more sharpening with slightly higher AMOUNT settings, but so far this would be my recommendation.
CAPTURE SHARPENING WORKFLOW TIPS
1. Lightroom is designed with a top-to-bottom workflow in mind, because changing one parameter affects the settings required of others. For example, increasing the exposure of an underexposed image will increase the requirement for noise reduction. We should complete our adjustments in the BASIC panel before moving to the DETAIL panel for sharpening. Although a top-to-bottom workflow is most effective, moving back and forth from panel-to-panel and between controls within panels for iterative readjustment and fine tuning is the essence of a good Lightroom workflow.
2. Lightroom automatically applies a small amount of sharpening to all images by default, but this is seldom ideal for landscapes or X-Trans files. You can create your own sharpening presets in the left-hand presents panel, to automatically set all the sharpening parameters to defined values.
My default landscape sharpening preset recommendations after ENHANCING a RAF file, are as follows:
X-Trans2 & 3 (X-T1, X-T2, X-Pro2)
NORMAL : Amount 35, Radius 1.0, Detail 100, Masking 10
SHARP : Amount 45, Radius 1.0, Detail 100, Masking 10
TACK : Amount 55, Radius 1.0, Detail 100, Masking 10
X-Trans4 & 5 (X-T3, X-T4, X-Pro3, X-E4 & X-T5)
NORMAL : Amount 90, Radius 1.0, Detail 10, Masking 10
SHARP : Amount 100, Radius 1.0, Detail 10, Masking 10
TACK : Amount 110, Radius 1.0, Detail 10, Masking 10
This particular naming convention ensures that when the settings are listed alphabetically, they are also listed in order of magnitude of sharpening applied from the least to the greatest.
3. We should magnify the whole image to 100% (some photographers advocate using 200% on high resolution retina screens) before applying capture sharpening. The aim is to sharpen the image by an appropriate amount while keeping it looking natural. Throughout the process, repeatedly examine any areas of high contrast or edges and avoid the introduction of artefacts and haloes.
4. Holding down the OPTION / ALT key on the keyboard while moving any of the sliders switches to a black and white view, removing the distraction of colour contrast. This is essential when using the MASKING slider and useful when using the AMOUNT slider; it removes the distraction of colour contrasts and reveals the luminance channel on which the sharpening is actually performed.
5. The AMOUNT slider specifies the overall level of sharpening to be applied. Ask the question: are there any areas within the image that contain textural detail that needs sharpening? If the answer is yes, increase the AMOUNT until those areas start to look 'crunchy', then pull back a little. Images made using the best lenses on cameras with high resolution sensors can take more sharpening before developing haloes and artefacts.
6. The RADIUS slider determines the spread of the sharpening effect on either side of edges, it approximates the number of pixels over which the sharpening is applied, while a high value accentuates sharpening, it also causes unwanted haloes. Increases in both AMOUNT and DETAIL will accentuate the effect of the RADIUS setting. For landscape images I find values as low as 0.6 or 0.7 can work well, but portrait photographers will often favour values above 1.0 and use correspondingly lower values for AMOUNT and DETAIL. I have found with my X-Trans files that setting RADIUS to 1.0 works well with such high DETAIL settings. Use lower RADIUS settings for high resolution images containing fine textural detail but be wary of introducing artefacts and haloes.
7. While AMOUNT and RADIUS control the degree of sharpening, the DETAIL slider determines how the sharpening is performed by changing the individual bias of various mathematical algorithms used to sharpen the image. Conventional wisdom suggests that small values are more suited to ‘low-frequency’ less detailed images. High values are more useful for ‘high-frequency’ images with fine textural details. For practical purposes, we can think of the detail slider as controlling the emphasis of fine detail. The AMOUNT and DETAIL sliders both accentuate sharpening and increase noise, an increase in one parameter often requires a decrease in the other and an increase in either setting might lead to a requirement for noise reduction using the LUMINANCE slider.
8. All the above sliders apply sharpening globally, but our ultimate objective is often to only sharpen certain elements. The MASKING slider allows us to ‘turn-off’ sharpening in the solid or smooth toned areas of the image to remove the distraction of unwanted artefacts or noise. In landscapes, this most commonly applies to skies. With MASKING set to zero and OPTION / ALT held down, the whole image starts off white, indicating that sharpening will be applied to the whole image. As we increase MASKING from zero, any areas that become black will not be sharpened at all and any areas that remain white will be.
9. Should MASKING not allow the control required to eliminate sharpening in a particular area of the image, then we can use an ADJUSTMENT BRUSH with a setting of -50 to make local changes and completely remove any sharpening globally applied by the DETAIL panel, regardless of the AMOUNT. Setting the brush sharpness to less than -50 will actively blur the image and using a positive setting will enhance sharpening locally, this is known as ‘creative sharpening’.
If you have any followers using X-Series cameras, please share this blog on your social media platforms and if you have any comments, feel free to contribute below. If you would like more hints and tips about creative landscape photography then please follow me on Vero, where I share useful tips on a weekly basis.